


When you’re doing your regular garage door maintenance, it’s important to check the status of the door’s rollers each and every time. Catching roller wear and tear early means you’ll be able to easily replace those rollers before they turn into screaming, screeching garage door nightmares. Although most garage door professionals recommend that homeowners with great caution replace rollers, they can be swapped for new ones using tools you probably already have around the house. 
Before you ever begin replacing your garage door rollers, make sure you’ve disconnected the garage door from your garage door opener and your opener from the power. It may seem a bit redundant, but when it comes to getting injured doing DIY, your garage door opener is up there with the most dangerous things in your house. Power off and a disconnected trolley ensure there’s no chance for an accident. It’s also a good idea to balance your garage door before you replace the rollers. That way the garage door won’t fall on your head when you’re working or otherwise get away from you. Safety first, it can’t be said enough. Garage doors can weigh more than a full grown man — the last thing you need is one landing on you unexpectedly.
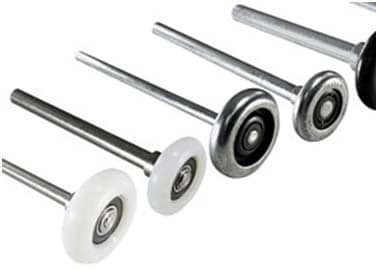
Before you can change your rollers, you’ve got to get some new ones in hand. You’ve basically got two choices: metal or vinyl. Vinyl are becoming very popular because of their low maintenance and incredibly low noise levels. However, some people still like the old fashioned metal rollers for their longevity and relatively low cost. Whichever you choose, make sure you understand what you’ll need to do to keep them in their best shape before installing them on your door.
A Simple Trick for Replacing Rollers
Replacing garage door rollers seems like a really intimidating job, but it’s actually amazingly easy. There are many garage door experts that will say the same thing. You’ll need a few tools, including a pair of vice grips, a small pry bar or long flathead screw driver and a hammer, as well as your new rollers. 10 rollers should be plenty for a seven foot door, you’ll need 12 for one that’s eight foot tall.
Once you’ve run through your safety precautions and have a helper ready in case your door gets away, it’s time to get started:
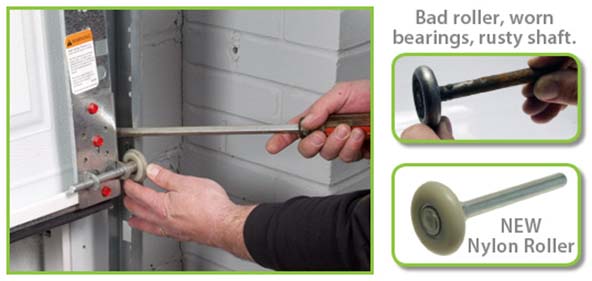
Working with just one side at a time, choose a spot on the rail near the top of the door, roughly two to three inches above the top roller. Use the vice grips to clamp down on and pry open the rail by the edge deepest inside the garage. This garage roller replacement video will show you this process in detail, if you need it. You may need to clamp and pry in a couple of adjacent spots to open the track enough to free the rollers — make sure you bend an area that’s at least one-inch wide so you can pull the rollers out completely.
Lift your garage door to the point where the top set of rollers reaches the section where you’ve pried the track open. Now, carefully pop the first roller out of the track, using a pry bar or long screwdriver if necessary. Slide the roller out of its hole in the garage door hinge (or tap it out with a hammer if it’s very rusted) and replace it with the new one.
Push the new roller back into the track, using gentle force if necessary. Continue all the way down the left side of your door. Once you’ve finished and the door is safely above you, quickly bend the track back into line before bringing the door back down to the ground. Repeat this trick with the rollers on the right side of the door.
Once you’ve got your rollers changed out and your track bent back into shape (this is very important, so don’t skip on it), you can reconnect your door to your garage door opener and reconnect the power to your unit. You may have to reprogram your garage door remotes, depending on the model of your opener.
Terry from Prestige Doors says “garage door maintenance is massively important when it comes to protecting your garage and the contents within.
This is a collaborative post.